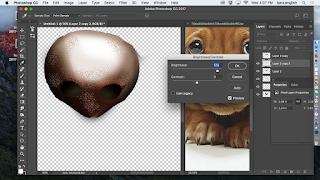
In Photoshop Window tab choose 3D create file from Mesh. This time I want a cone to have a basic dog nose shape.
When asked do not switch to 3D workspace.
An nose is basically a cone. To look correct, the light must be directly from the front. Move the light around to be seen from the front. The light view is the smaller window. The light is directly in front of the sphere.
First select and cut the shadow to remove it. Unless your animal has frosty's nose you must use puppet warp to look correct. Under edit, puppet warp select the cone.
I have reshaped it to remove the point and to have a slight tip.
I then choose a paint brush and brown grayish color to paint with a smooth airbrush.
I fill in the white on the nose to all but a small amount to be similar to the puppy nose that I am following.
On a new layer and with a darker black and my air brush, I then fill in the nose so that it looses it's cone shape
There is a dark line at the top of the nose shape so with my airbrush I paint that as well.
Here I am examining what I need to add. The nostrils will come next.
I create the nostril with my shape tool.
I change the contrast of it so that it can show up.
I duplicate the shape and edit transform to flip it horizontally.
Next I change the color balance to look more like the pup's nose in the photo.
Once again I adjust the nose, using the burn and dodge tools to lighten and darken areas.
I duplicate the paint layer, and dissolve the paint to add specks, adjusting transparency as needed.
Duplicate that layer and adjust it with brightness and contrast to create white texture.
Next I select the textures and blurred the areas to be not so heavy handed.
On the non textured area I adjust the color in adjust curves.
I copy that layer and played with adjustment as well to make it look more real.
Repeat this step as needed.
I adjust the shape of the nostrils and ad the crease down the middle.
I adjust the color one last time, and am happy with the similarity to the photo.
I save it as a Photo shop document. Then I flatten the nose and save it as a large jpg. The nose is then ready for use in a front on dog drawing.


No comments:
Post a Comment