Anyone can draw if they trick their mind into believing it. If you do not draw you probably think that you cannot draw. Learning to draw is similar to learning to write. In the 1800's students started school by practicing making beautiful shapes. We learn triangle, circle, square, and rectangle in preschool and kindergarten today. Begin with what you know. You also know the basic shapes of the letters of the alphabet at the very least.
Start by thinking about what shape is the object that you want to draw. If you are looking at a photograph, start with a large abstract object in the photo. Lets start with a simple owl. Lets suppose that the body of an owl is as simple as an abstract oval.
So lets get real, I want to do an owl that is cool, so I will draw him in Adobe Photoshop and use the shape tools. The oval is easy to make from a circle, but you can also make a oval shape and use it over and over.
To make a custom shape you must use the pen tool or path. I am using the pen pen tool here and start with a two point line.
If I just manipulate it with one point in the middle I can make a curve, but with two points near the original points I will have control to do what I want to with my oval.
Here I then grab the middle and pull to create the top at whatever amount that I want it to arch. This may take a little practice.
Repeat steps one and two on the same shape layer starting with the line and points to make the bottom of your shape.
With your shape still selected choose Define Custom Shape
Using the custom shape to in Pixel Mode I then draw the owl body with no fill. Then I created one eye oval shape in tan, using edit to free transform it to angle in. I duplicated the layer, using edit to free transform film horizontal to create the mirror effect as shown below.
I repeated these two steps to create the brown circles.
Next using the same oval shape I made the stomach in a similar color.
The ears were drawn in with the pin tool and duplicated and rotated as well.
Next I drew a more whimsical shape as the beak but was not satisfied and left it alone for the time being.
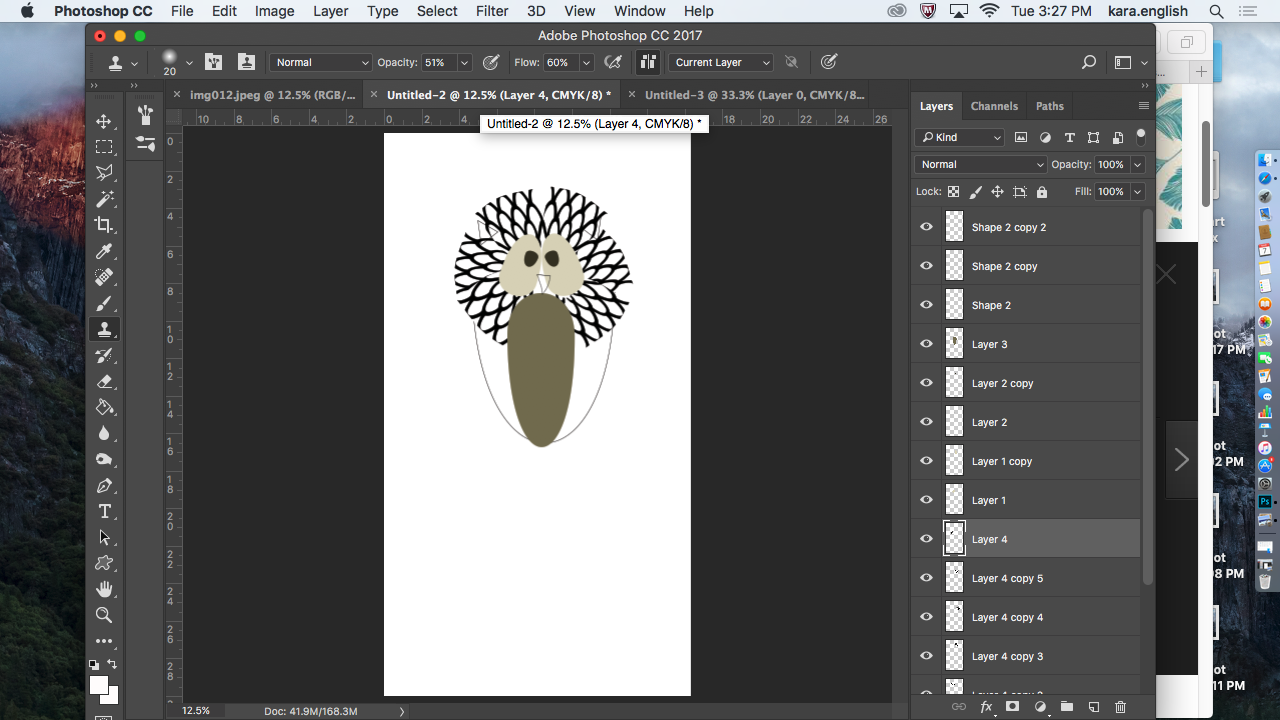
I want feathers, but using a feather pattern will not be as realistic as I want it to follow the eyes and the body of the owl. After experimenting with a feather pattern that I found, I used edit, puppet warp to distort it so that it grows from smaller to bigger.
On a layer above the original oval, but beneath the eye ovals, I added and placed the first layer of feathers and duplicated it six more times. Notice how the hole at the top is covered by the oval eyes.
Here I added the next four groups of feathers under the stomach oval.
Here I turned off all the layers except for the oval line shape. While clicking the command key I also click the box on the shape layer. This will select the oval. I want to invert the selection so I choose under select invert.
First I turned on all the feather leaders then I choose delete and cut the extra feathers out of the background.
After turning off the feathers I selected the oval layer once more.
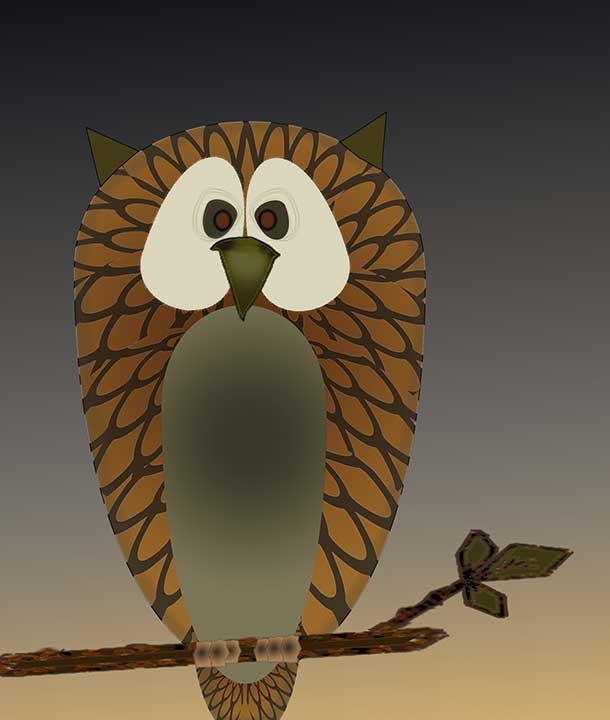
Using the gradient tool and the gradient mode that pours from the center out. I drew a line up from the center and pound a dark brown, light brown gradient. You can see the colors in the swatch at the bottom.
I merged all the layers of the feathers together making sure it is still above the shape layer.
Turning on the other layers I look at the progress. The feathers still need work. I change the opacity the feathers to lighten the color.
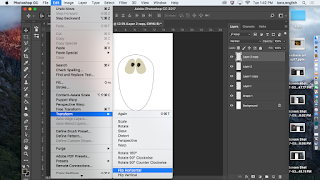
Next I want the eyes to have a black line around them and a fun way to do this is to select it and modify it in select to modify border. I use a 9 point border and on a new layer poured black around the shape and then merged the two together. This makes a smoother line this way.
On a separate page, I drew the twig and leaves using the line shape pixel tool and duplicated it to the owl.
I poured in colors and used various filter tools on the twig until I was satisfied.
Zoomed in you can see my first attempt at the foot. I started with a rectangle, poured a similar brown in as a gradient in a similar manner as the body. I applied several filters and then used puppet warp to modify the shape.
I duplicated this to make six toes, and move and change sizes so that I have a foot look.
Looking at the owl I decide a tail is needed and duplicate the ovals together that make the body and resize them to the small tail shape.
The background gradient for the sky is perfect. It is one of the new photo gradient in CC17.
Inspired, I add a new layer and select the stomach. I add a darker gradient from the center out for this.
I decide to add a new layer above each of the large eye ovals. I select and modify a boarder for them adding a darker color.
Under layer style I choose dissolve. This gives it a custom whimsy look.
On the darker eyes I do the same, but I use the fragment filter.
Note the googled look to his eyes now. I also crop the piece and at this time reform the branch and apply other filters to make it more real.
For finishing touches on the beak and ears with paint, then chose the shape of the body again. On a new layer I used the brush to outline the selected shape. Then I used blur to soften the line.
I saved him in a variety of ways, here is the exported jpeg.